[:en]
Electronique de commande smoothieboard et compatible
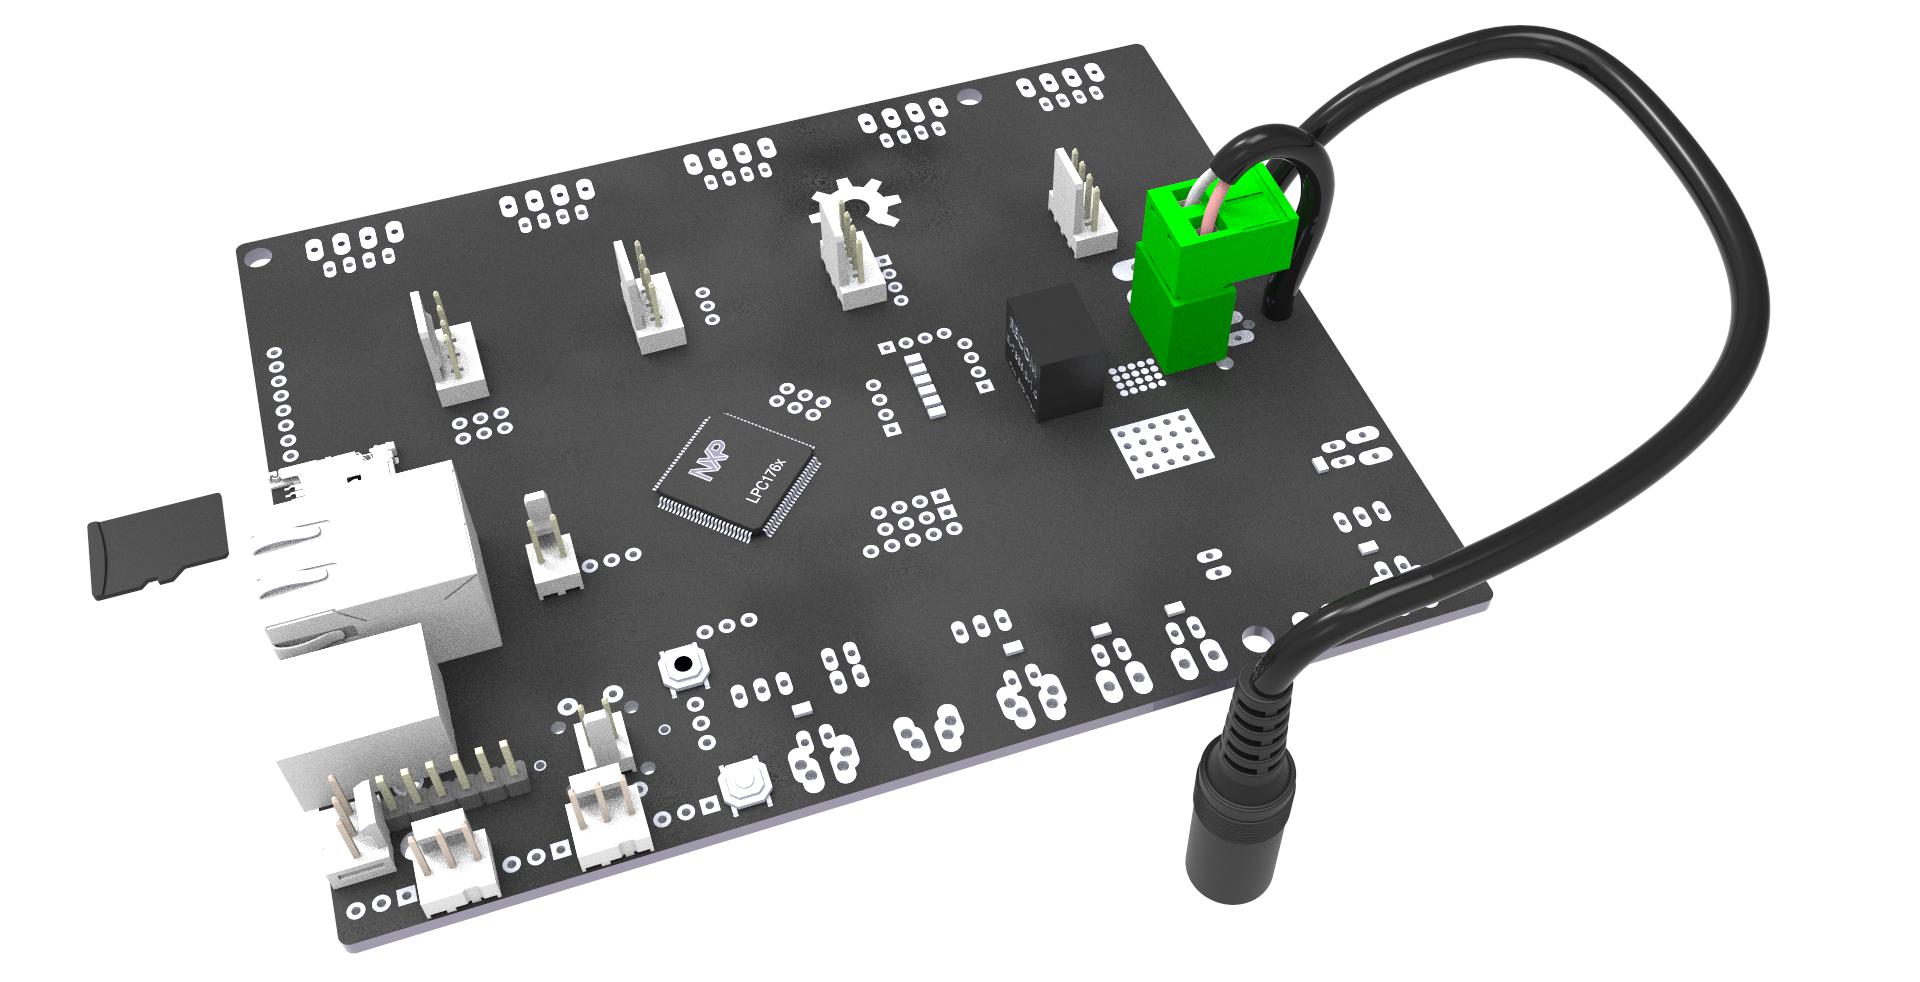
I ) SD Micro card
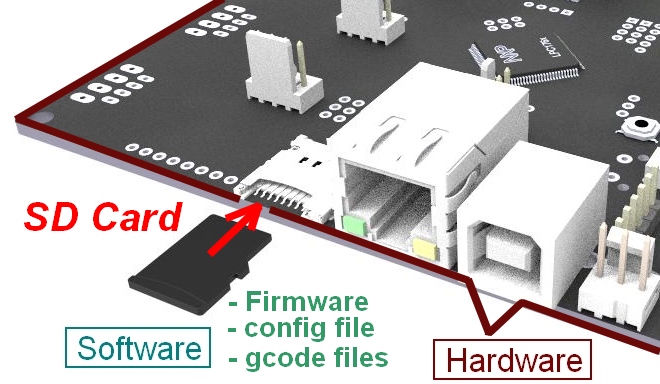
We can separate the smoothieboard controler in
Software part :
Firmware —-> can be update
config file —-> setting of smoothieboard
Gcode files —> machining path
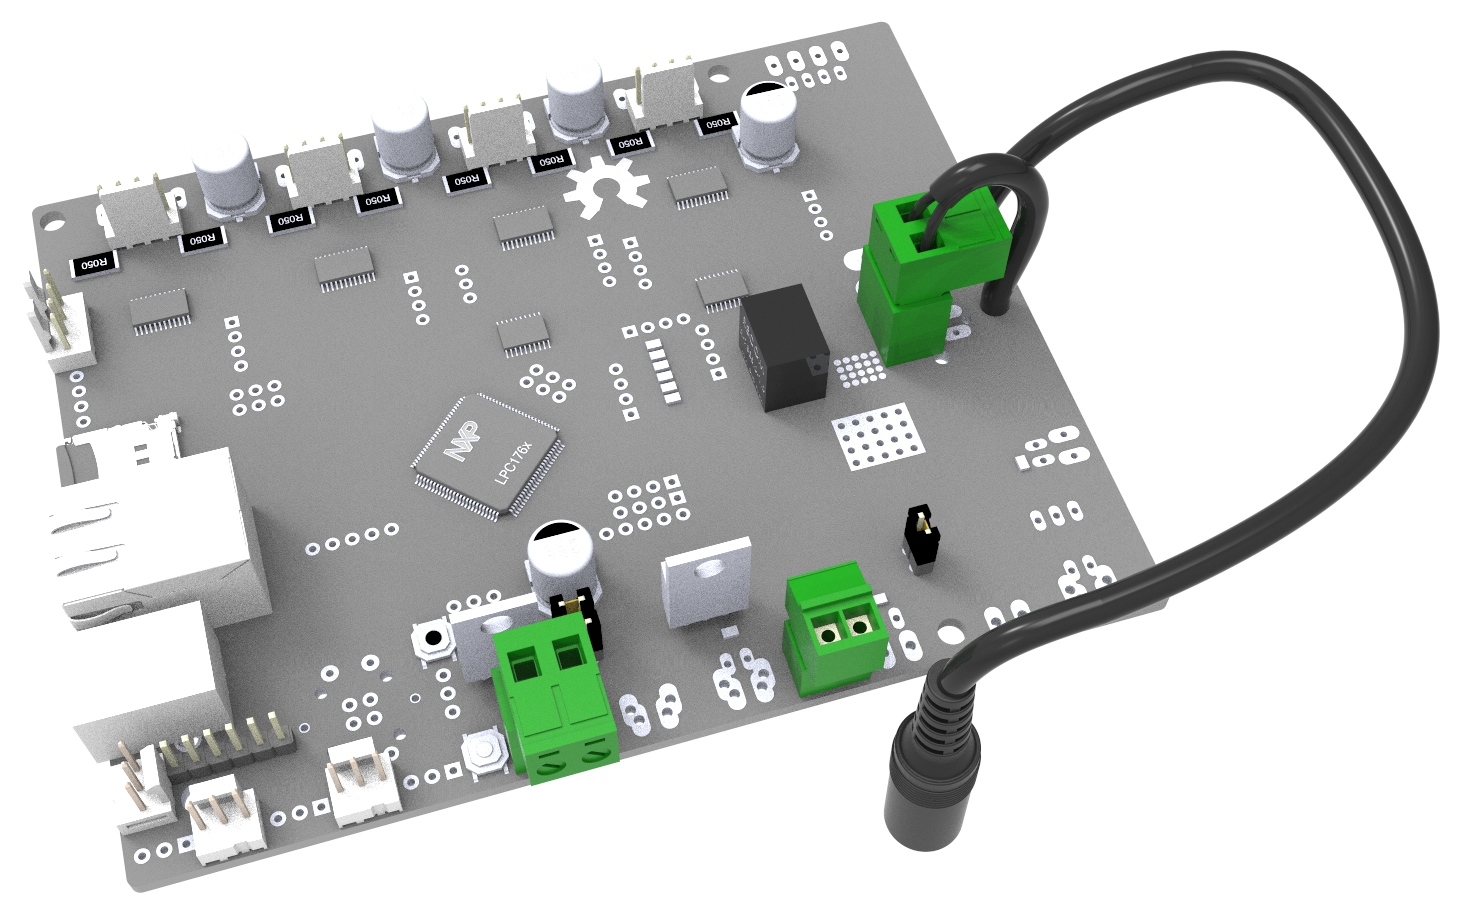
Hardware électronic board with :
32-bit Cortex-M3 LPC1769 processor
with 512kB flash and 64kB RAM
Ethernet and USB connections
Various inputs and outputs for extensibility
Without Sd-card the smoothieboard can’t works
 If the smoothieboard can’t read the two file more important
config and Firmware.cur, the smoothieboard don’t start.
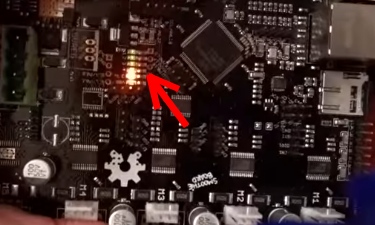
If have problem with sd-card or firmware inside sd-card.
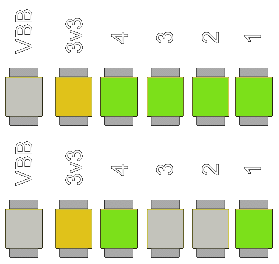
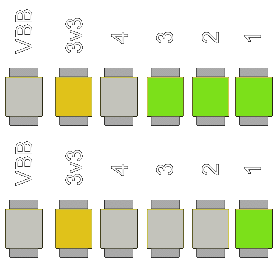
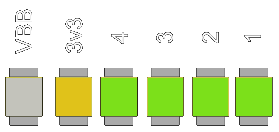
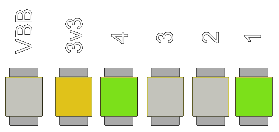
Can see with color of led.
Don’t mix smoothieboard firmware and config with gcode file.
Create special folder ‘gcode » for exemple to put machining file inside.
If you don’t can do mistake and delete sometimes important file.
Can have two more file, depend of options you choice.
-
config-override : – Created when the g-code M500 is played.
-
on_boot.gcode : – Played on startup of smoothieboard. Can be used to initialize the smoothie driven device.
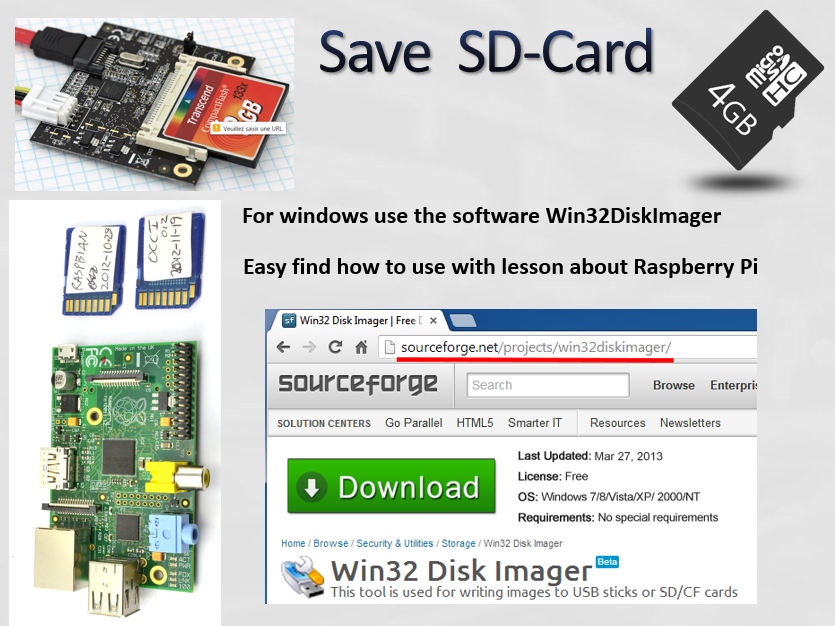
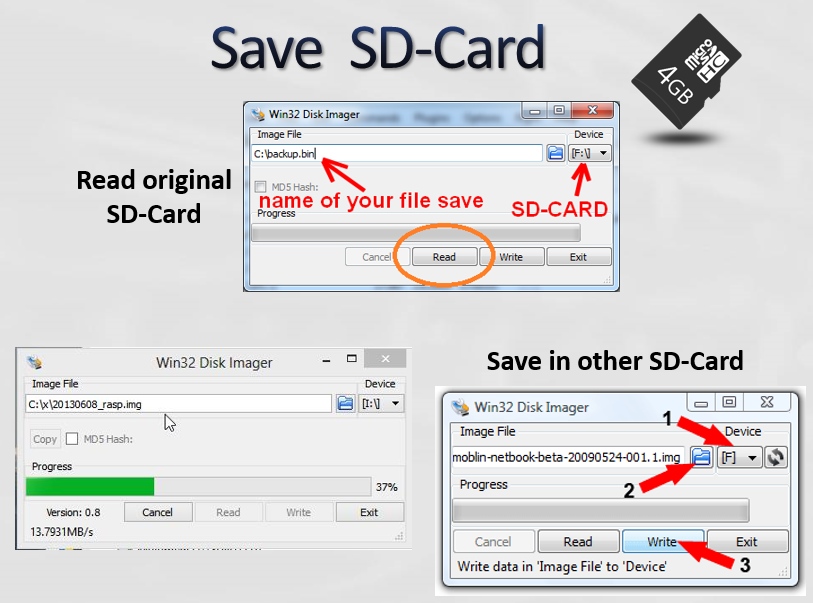
It’s important save firmware and config file in other place of sd card for exemple computer, if you change something and whant return back, can find original file.
Overway is to copy sd-card to other sd-card (like copy sd-card for raspberry pi)
|
All is normal
|
The Led 2 and 3 blink at this speed The Les 4 and 1 stay on |
|
Sd-Card problem
|
The Led 4 stay off |
|
Firmware crash
|
All green led stay on or Led 3 and 2 stay off |
For overcome problem see Troubleshooting section of smoothieboard documentation http://smoothieware.org/troubleshooting#troubleshooting-a-problem-with-your-smoothieboard
Many settings in smoothie can be set immediately with M commands, these settings are lost on reset, however they can be saved to a non-volatile storage (similar to EEPROM on other systems).
The values in the configuration file will be overridden for those configuration options.
There is a set of M-codes (M50x) documented below that allow you to save all the current settings that have Mxxx commands to set them. This is particularly convenient for parameters that require tuning, as you can use a command to modify them without having to open the file and reset the board.
As these settings can be temporarily overridden with Mxxx commands there is a way to save these settings. Once saved they are reloaded on reset or boot overriding the settings in the config file. If you then edit the config file, make sure the setting you are editing is not being overridden by the override file (M503 will tell you if there is an active override file). This can sometimes explain why editing the config file appears to have no effect.
| M-code | Description | Example | ||||
| M500 | Save settings to an override file | |||||
| M501 | load config-override file optionally specifying the extension | M501 – loads config+override, M501 test1 – loads config+override.test1 | ||||
| M502 | Delete the override file, reverting to config settings at next reset | |||||
| M503 | Display overridden settings if any | |||||
| M504 | Save the settings to an override file with specified extension | M504 blue-pla |
Crashing
Do not issue M500 or M504 when gcode is read by machine, or the machine could crash or the SD card become corrupted.
Do not
Edit the config-override file yourself, only use the commands to edit the values.
I ) SMOTHIEBOARD AXIS
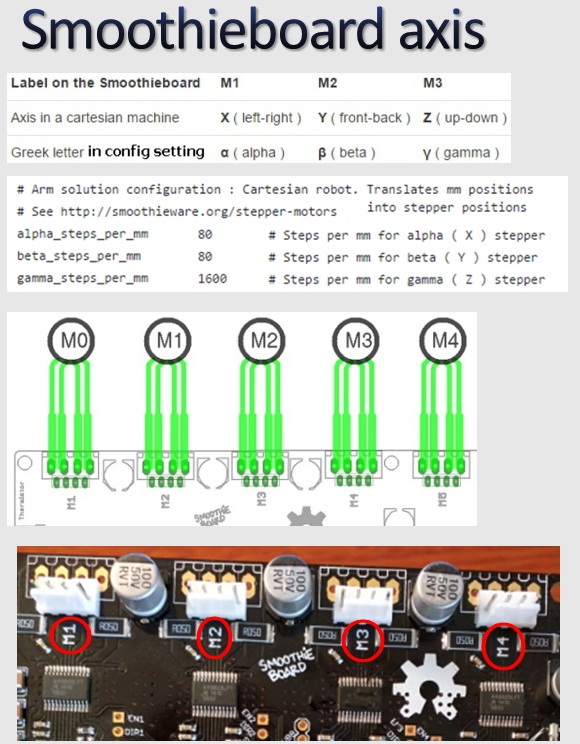
In the config file alpha match with M1 motor axis
beta match with M2 motor axis
gamma with M3 motor axis
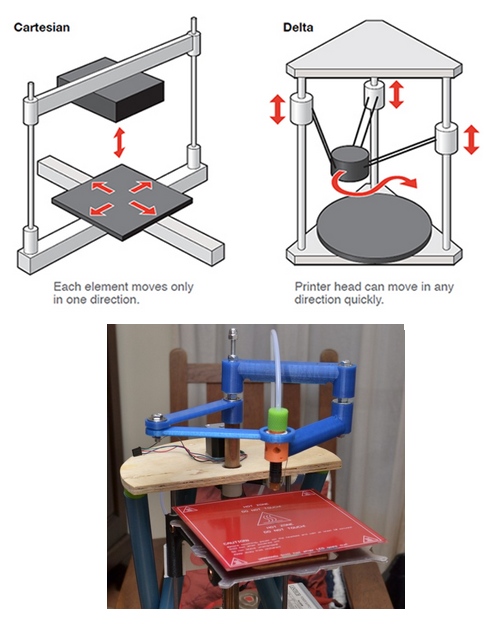
Smoothiesboard is universal for all CNC machine, no need have different electronic board for CNC Milling machine other for Laser cut machine etc. …
The config file already have inside the different function for all machine
Just change the setting about your kind of machine.
I ) OPTIONS IN THE CONFIG FILE
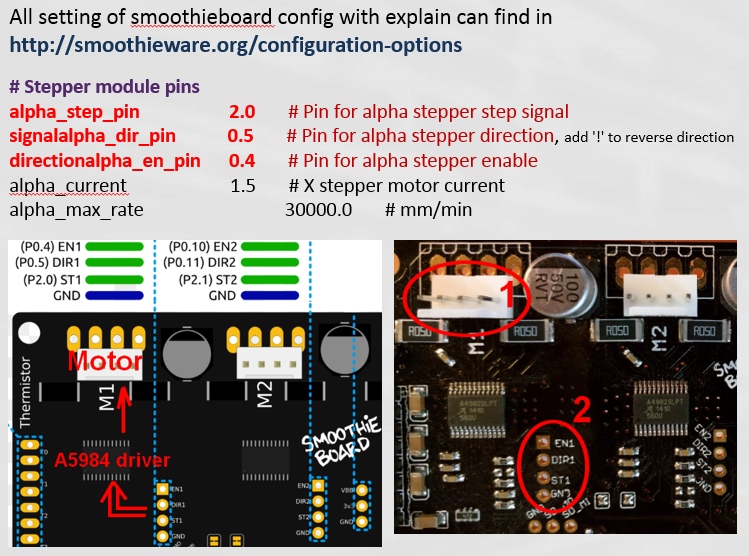 In smoothieboard, for control steppers motors, can use :
Internal stepper driver : A5984 stepper drivers with 1/32 microstepping
2A max
External stepper driver : The reason to use external is when people need more power for example 3A 4A 7A
When use internal stepper driver the motor is connect to plug write 1
When use external driver, the external driver is connect to place write 2 with EN STEP DIR and GND pin
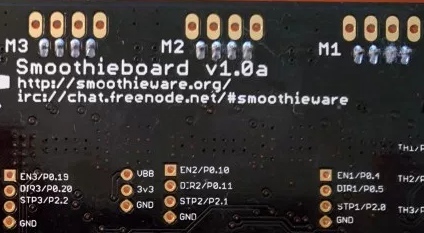
All name and number of pins are write in back face of smoothieboard
The number of pin in smoothieboard need match with number of pin in file config.
When you receive the electronic board all setting are OK
After when you understand the config of pin all can be change
have many possibilities of différents configurations.
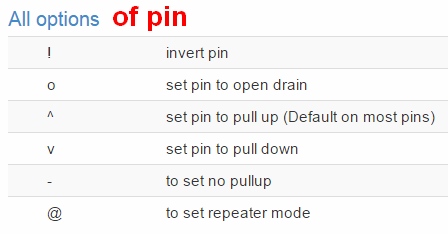
my_pin_name number of the pin (option)
For example : signalalpha_dir_pin 0.5!
alpha_min_endstop 1.24^
When the motor don’t turn in correct direction, no need change the wire, just add
! after the pin number
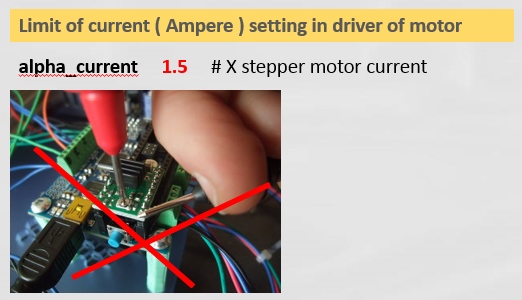 With smoothieboard, no need use screwdriver and turn potentiometer to setting with difficulty the limit of current, like drivers of a lot of 3d printer.
All internal stepper drivers have digital potentiometer.
Just write 1.5 in alpha_current setting and stepper driver works to 1.5A
The limit without cooling system ( fan ) is 1.6A
1.6 to 2A (max) need use fan on top of electronic.
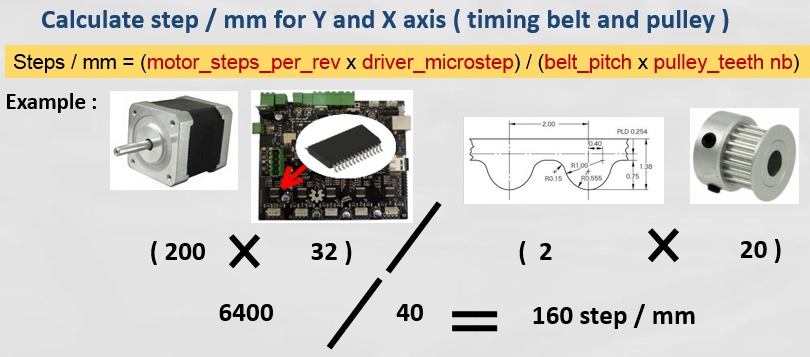
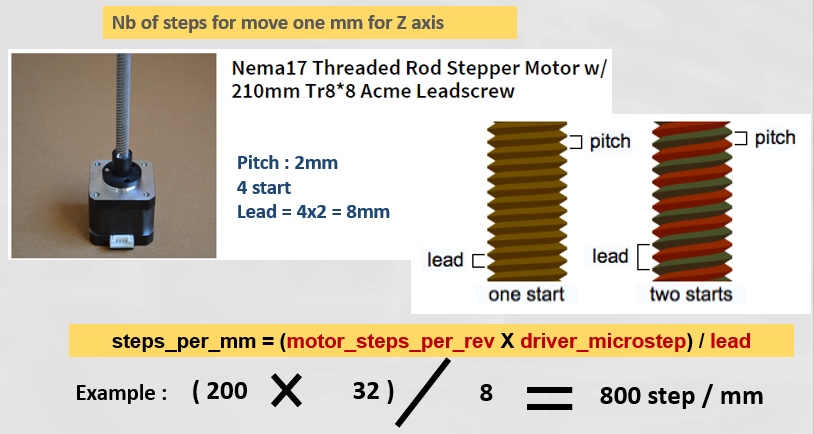
I ) The number of step for the machine move of 1mm depend of différent things
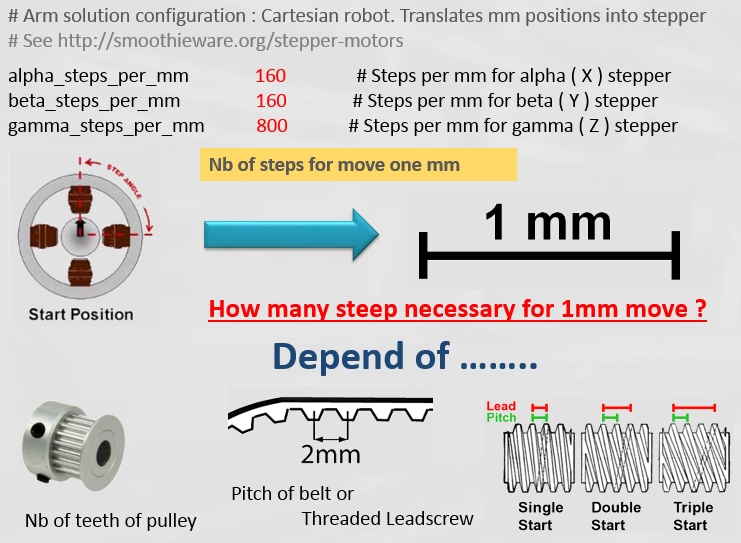
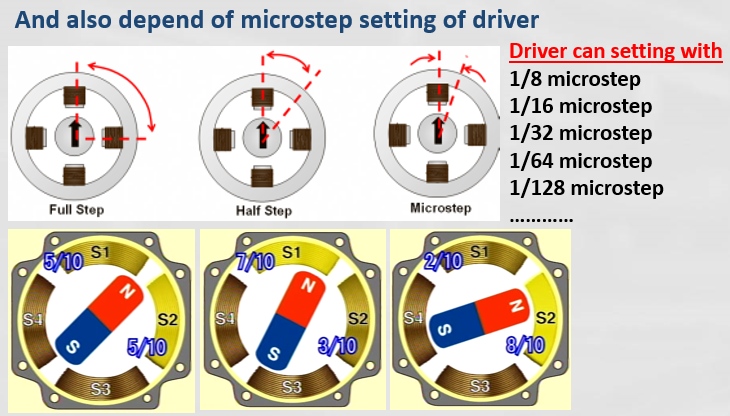
II ) Calculate for timing belt / pulley transmission
III ) Calculate for Threaded Leadscrew
IV ) If reality a little différent theory
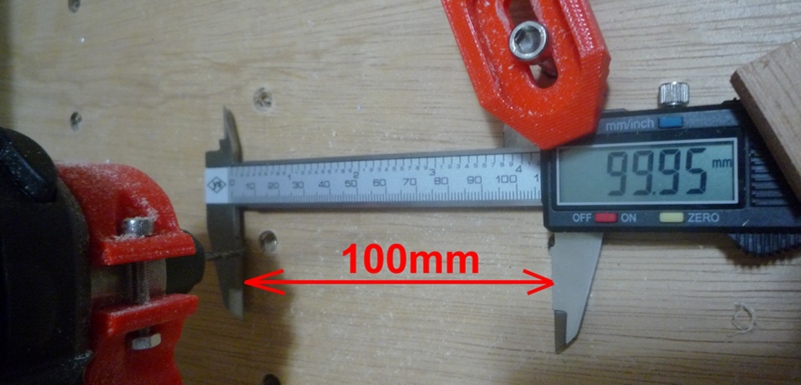
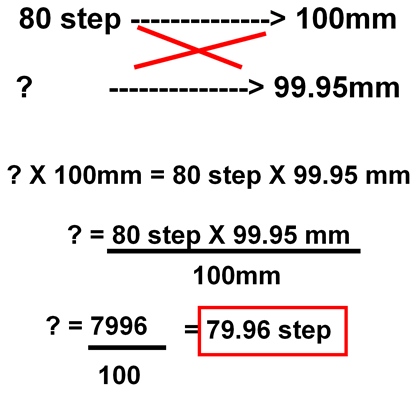
I was never have problem with machine move à little different than the calculate.
But if you have this just use a accurate measurement tool
and recalculate like below.
Electronique de commande smoothieboard et compatible
I ) SD Micro card

We can separate the smoothieboard controler in
Software part :
Firmware —-> can be update
config file —-> setting of smoothieboard
Gcode files —> machining path
Hardware électronic board with :
32-bit Cortex-M3 LPC1769 processor
with 512kB flash and 64kB RAM
Ethernet and USB connections
Various inputs and outputs for extensibility
Without Sd-card the smoothieboard can’t works
 If the smoothieboard can’t read the two file more important
config and Firmware.cur, the smoothieboard don’t start.
If have problem with sd-card or firmware inside sd-card.
Can see with color of led.

Don’t mix smoothieboard firmware and config with gcode file.
Create special folder ‘gcode » for exemple to put machining file inside.
If you don’t can do mistake and delete sometimes important file.
Can have two more file, depend of options you choice.
-
config-override : – Created when the g-code M500 is played.
-
on_boot.gcode : – Played on startup of smoothieboard. Can be used to initialize the smoothie driven device.
Overway is to copy sd-card to other sd-card (like copy sd-card for raspberry pi)
|
All is normal
|
The Led 2 and 3 blink at this speed The Les 4 and 1 stay on |
|
Sd-Card problem
|
The Led 4 stay off |
|
Firmware crash
|
All green led stay on or Led 3 and 2 stay off |
For overcome problem see Troubleshooting section of smoothieboard documentation http://smoothieware.org/troubleshooting#troubleshooting-a-problem-with-your-smoothieboard
The values in the configuration file will be overridden for those configuration options.
There is a set of M-codes (M50x) documented below that allow you to save all the current settings that have Mxxx commands to set them. This is particularly convenient for parameters that require tuning, as you can use a command to modify them without having to open the file and reset the board.
As these settings can be temporarily overridden with Mxxx commands there is a way to save these settings. Once saved they are reloaded on reset or boot overriding the settings in the config file. If you then edit the config file, make sure the setting you are editing is not being overridden by the override file (M503 will tell you if there is an active override file). This can sometimes explain why editing the config file appears to have no effect.
| M-code | Description | Example | ||||
| M500 | Save settings to an override file | |||||
| M501 | load config-override file optionally specifying the extension | M501 – loads config+override, M501 test1 – loads config+override.test1 | ||||
| M502 | Delete the override file, reverting to config settings at next reset | |||||
| M503 | Display overridden settings if any | |||||
| M504 | Save the settings to an override file with specified extension | M504 blue-pla |
Crashing
Do not issue M500 or M504 when gcode is read by machine, or the machine could crash or the SD card become corrupted.
Do not
Edit the config-override file yourself, only use the commands to edit the values.
0 commentaires
Electronique de commande smoothieboard et compatible
Nous aborderons ici les technologies des cartes smoothieboard et compatible, mais seulement celles dédiés au pilotage des machines outils CNC. Concernant le pilotage des imprimantes 3D avec une carte smoothieboard il y a déja pléthore de documentation sur le Web.
Si l’on prend les cartes électroniques smoothieboard originales

Il est inutile d’utiliser les modèles 3X 4X 5X possédant respectivement 2, 4 et 5 drivers internes car ces drivers internes sont limité à 24V 2A, suffisant pour piloter des imprimantes 3D mais insuffisant pour faire fonctionner les gros moteurs PAP d’une fraiseuse CNC qui doit faire déplacer un outil dans de la matière.
Le modèle smoothieboard OX plus drivers externes puissants est mieux adapté.
La carte smoothieboard originale utilise un microcontrôleur 32-bit Cortex-M3 LPC1769 fonctionnant à une fréquence maxi de 120Mhz
I ) La configuration des sorties pilotant les drivers PAP externes
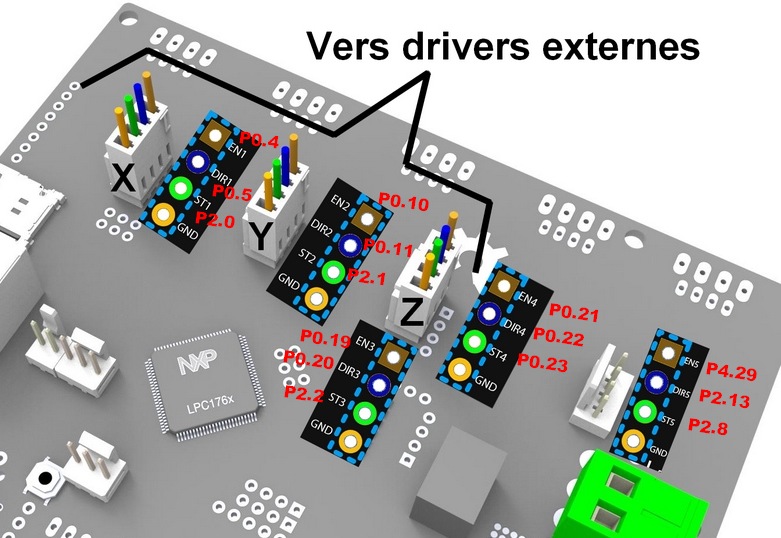
Les pins (broches) sur la carte correspondent au fichier de configuration
Si des axes ne sont pas utilisés, les pins peuvent être utilisés pour autre chose.
Par exemple, le 5ème axe vous est inutile et bien les pin 4.29 2.13 et 2.8 peuvent être branchés à autre chose à condition bien sur d’adapter le fichier de configuration
alpha_step_pin                               2.0              # Pin for alpha stepper step signal
alpha_dir_pin                                0.5              # Pin for alpha stepper direction, add '!' to reverse direction
alpha_en_pin                                 0.4              # Pin for alpha enable pin
alpha_current                                1.5              # X stepper motor current
alpha_max_rate                               30000.0          # Maximum rate in mm/min

beta_step_pin                                2.1              # Pin for beta stepper step signal
beta_dir_pin                                 0.11             # Pin for beta stepper direction, add '!' to reverse direction
beta_en_pin                                  0.10             # Pin for beta enable
beta_current                                 1.5              # Y stepper motor current
beta_max_rate                                30000.0          # Maxmimum rate in mm/min

gamma_step_pin                               2.2              # Pin for gamma stepper step signal
gamma_dir_pin                                0.20             # Pin for gamma stepper direction, add '!' to reverse direction
gamma_en_pin                                 0.19             # Pin for gamma enable
gamma_current                                1.5              # Z stepper motor current
gamma_max_rate                               300.0            # Maximum rate in mm/min
II ) La configuration des pins de fin de course (endstop)
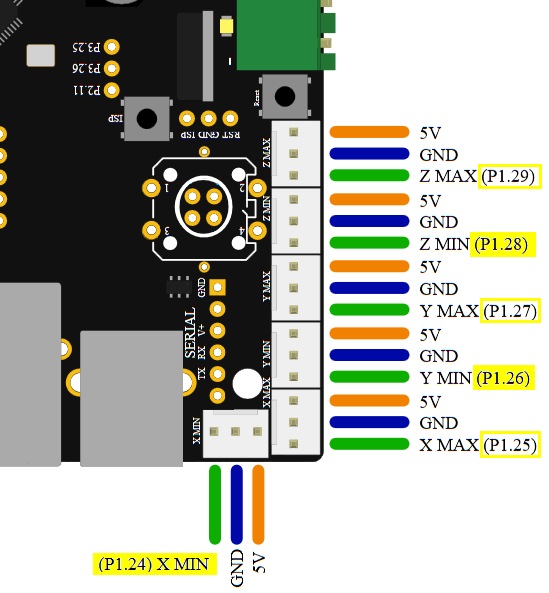
## Endstops
# See http://smoothieware.org/endstops
endstops_enable true
alpha_min_endstop 1.24
#alpha_max_endstop 1.25
alpha_homing_direction home_to_min
alpha_min 0
alpha_max 200
beta_min_endstop 1.26
#beta_max_endstop 1.27
beta_homing_direction home_to_min
beta_min 0
beta_max 200
gamma_min_endstop 1.28
gamma_max_endstop 1.29
gamma_homing_direction home_to_min
gamma_min 0
gamma_max 200
alpha_max_travel 500
beta_max_travel 500
gamma_max_travel 500
Même principe que précédemment, si des fin de course max ne sont pas utilisé vous pouvez utiliser les broches pour autre chose
Les cartes SKR1.1 et SKR1.3 utilisent un microcontrôleur Cortex-M3 series LPC1768 fonctionnant à 100Mhz
Cette carte peut fonctionner avec les firmwares Smoothieware et Marlin 2.0
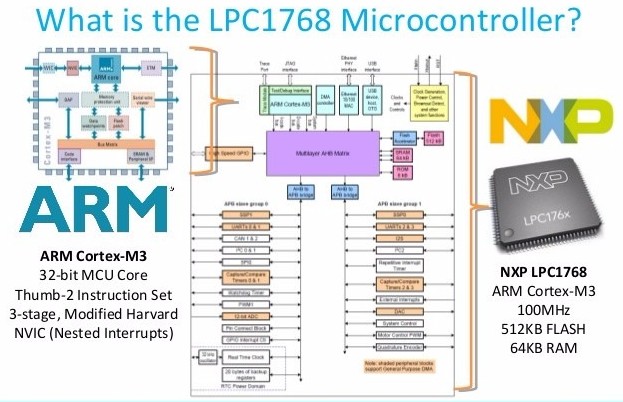
Les caractéristiques du microcontrôleur LPC1768 sont les mêmes que le LPC1769 mis à part la fréquence maxi du CPU de 100Mhz au lieu de 120Mhz

I ) La configuration des sorties pilotant les drivers PAP externes
Les pin utilisés dans le fichier de configuration sont pour la plupart différents de ceux de la smoothieboard originale
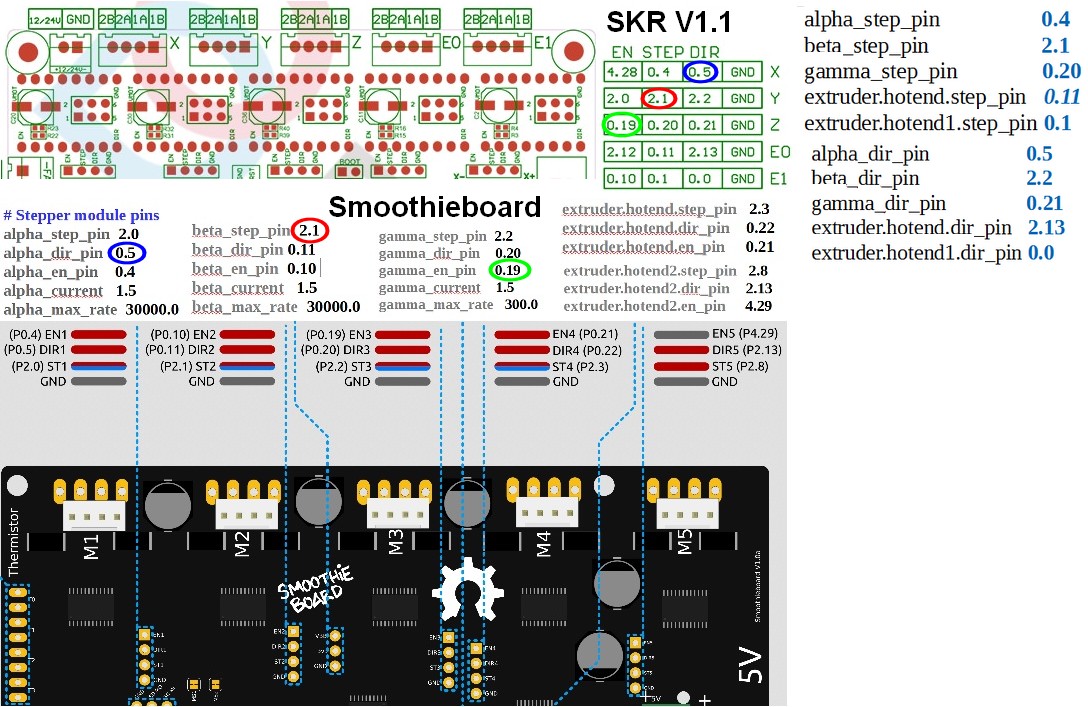
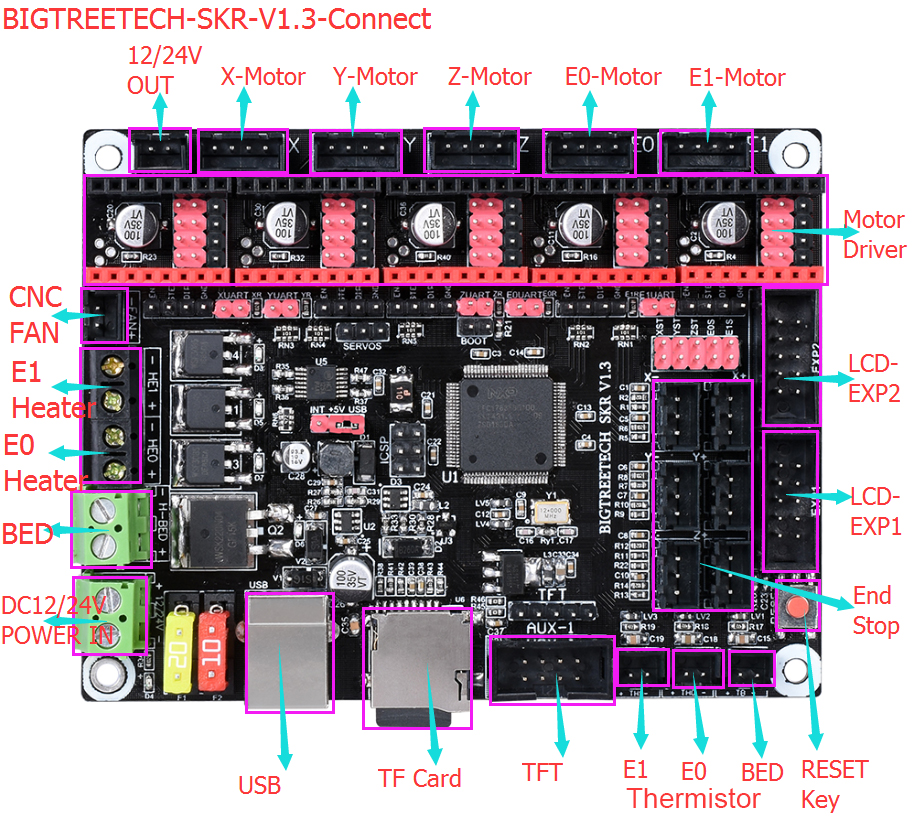
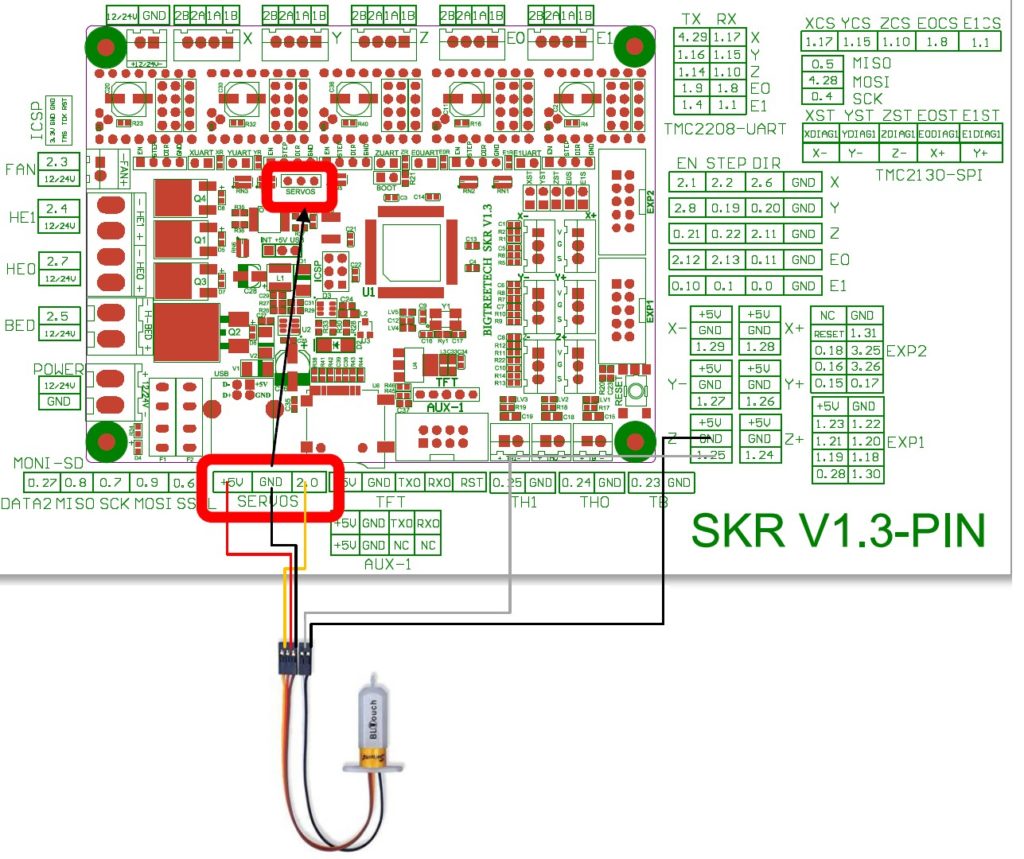
I ) La configuration des sorties pilotant les drivers PAP externes
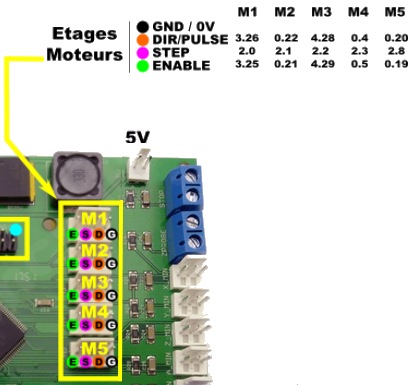
# axe X sur le M1
alpha_step_pin 2.0 # Pin for alpha stepper step signal
alpha_dir_pin 3.26 # Pin for alpha stepper direction
alpha_en_pin 3.25 # Pin for alpha enable pin
alpha_max_rate 3000.0 # mm/min
# axe Y sur le M2 et le M4
beta_step_pin 2.1 # Pin for beta stepper step signal
beta_dir_pin 0.22 # Pin for beta stepper direction
beta_en_pin 0.21 # Pin for beta enable
beta_max_rate 3000.0 # mm/min
# axe Z sur le M3
gamma_step_pin 2.2 # Pin for gamma stepper step signal
gamma_dir_pin 4.28 # Pin for gamma stepper direction
gamma_en_pin 4.29 # Pin for gamma enable
gamma_max_rate 3000.0 # mm/min
Les pins utilisés pour le pilotage des drivers externes sur cette carte SimpleCncMillBoard sont différents de la smoothieboard originale mais ils correspondent au fichier de config de la carte SimpleCncMillBoard
II ) La configuration des pins (broches) des fin de course (endstop)
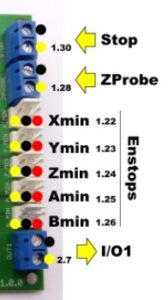
alpha_min_endstop 1.22!^ # add a ! to invert if endstop is NO connected to ground
alpha_max_endstop nc # NOTE set to nc if this is not installed
alpha_homing_direction home_to_min # or set to home_to_max and set alpha_max
alpha_max 500 # valeur positive # this gets loaded after homing when home_to_max is set
beta_min_endstop 1.23!^ #
beta_max_endstop nc #
beta_homing_direction home_to_min #
beta_max 500 # valeur positive
#
gamma_min_endstop nc # c’est le Zprobe qui est utilisé à la place de Zmin
gamma_max_endstop nc #
gamma_homing_direction home_to_min #
gamma_max 200 #
# param communs
endstop_debounce_ms 10 # anti-rebond pour les homing endstop en ms
#endstop_debounce_count 2000 # uncomment if you get noise on your endstops, default is 100
La connection du Probe
## Z-probe
zprobe.enable false # set to true to enable a zprobe
zprobe.probe_pin 1.28!^ # pin probe is attached to if NC remove the !
zprobe.slow_feedrate 20 # mm/sec probe feed rate
#zprobe.debounce_count 100 # set if noisy
zprobe.fast_feedrate 100 # move feedrate mm/sec
zprobe.probe_height 20 # how much above bed to start probe

0 commentaires